Training a custom LoRA (Low-Rank Adaptation) model is one of the most effective ways to personalize image generation. It allows you to teach an AI model specific styles, characters, or aesthetics without retraining the entire model from scratch. With Qwen-Image, a powerful vision-language model, you now have a strong foundation to build on. By combining it with ai-toolkit, an open-source tool that simplifies the training process, you can create a LoRA that fine-tunes Qwen-Image to your exact needs. In this article, we’ll walk through how to set up, train, and evaluate a Qwen-Image LoRA using ai-toolkit, along with practical tips for getting the best results.
If you’re thinking about purchasing a new GPU, we’d greatly appreciate it if you used our Amazon Associate links. The price you pay will be exactly the same, but Amazon provides us with a small commission for each purchase. It’s a simple way to support our site and helps us keep creating useful content for you. Recommended GPUs: RTX 5090, RTX 5080, and RTX 5070. #ad
AI-Toolkit Installation
Requirements:
- python >3.10
- Nvidia GPU: You need at least 24 GB VRAM to train a Qwen-Image LoRA, so you need a RTX 3090, 4090, or 5090.
- python venv
- git
Windows installation:
git clone https://github.com/ostris/ai-toolkit.git
cd ai-toolkit
python -m venv venv
.\venv\Scripts\activate
pip install torch==2.8.0 torchvision torchaudio --index-url https://download.pytorch.org/whl/cu128
pip install -r requirements.txt
Note that this is different from the instructions on the original repo, because I modified the steps for use with a RTX 50 series card.
Preparing the Dataset for LoRA Training
A well-prepared dataset is the foundation of a good LoRA. Since LoRAs are designed to adapt a base model (like Qwen-Image) to specific characters, styles, or subjects, your dataset needs to be both clean and representative. Here’s how to prepare it:
1. Collect Images
-
Aim for 20–200 images depending on the complexity of the subject.
-
Use a variety of poses, angles, and lighting conditions to help the LoRA generalize.
-
Avoid near-duplicates—too many similar images can cause overfitting.
2. Clean the Images
-
Make sure subjects are centered and visible.
-
Remove watermarks, logos, or cluttered backgrounds if possible.
3. Caption the Dataset
-
Each image needs a caption file (.txt) with a short, accurate description.
-
Include key features (e.g., “woman with long black hair wearing a red dress, standing in a garden”).
-
Be consistent in your naming and phrasing—this helps the model learn associations.
-
Tools like BLIP, Caption Anything, or Hugging Face captioning models can automate first drafts, which you can then refine manually. If you have Kohya SS, you can use it to help you captioning the images.
4. Organize the Folder Structure
-
Place all images and captions in a single folder.
-
ai-toolkit typically expects paired image + text file (e.g.,
001.png+001.txt). This is how it looks like in the directory.
-
Double-check that filenames match exactly.
5. Balance the Dataset
-
If training for a specific character, make sure at least 70–80% of the images are of that character.
-
Add 20–30% of varied “negative” or contextual images (different outfits, settings) to avoid overfitting.
6. Test the Captions
-
Run a few sample generations with your captions as prompts to check if they describe images accurately.
-
Refine wording before training begins—it’s much harder to fix after.
Key Tip: Quality beats quantity. A dataset of 30 clean, well-captioned images will usually outperform 150 messy or inconsistent ones.
Qwen-Image LoRA Training Configuration File
An example Qwen-Image LoRA training configuration is in config\examples\ folder. The file name is train_lora_qwen_image_24gb.yaml. Make a copy of the file and move it to config\ folder. Modify the file according to your need. I am listing some lines that I changed.
name: "character_qwen_image_lora_v1"
The name of the LoRA. This will be used to name the LoRA.
# trigger_word: "character_name"
I didn’t uncomment this line because this will not work with caching text embeddings which is necessary for 24GB VRAM setup.
- folder_path: "D:\\ai\\Training\\character_name\\img"
This is the folder where you store the training images and caption files.
steps: 2000
The total number of steps to train. The file suggests 500 – 4000 is a good range. For my data sets, I only got good results at around 5250 steps.
name_or_path: "D:\\Qwen-Image"
I downloaded the Qwen-Image model and set it here. If you don’t want to manually download the model, you can leave it as “Qwen\Qwen-Image”. The model will be downloaded automatically and saved under your cache directory.
Under the sample section, you can input some prompts to generate sample images. Mine looks like this.
- "character_name, an Asian woman in a red cheongsam dress sitting on a bench and posing for the camera"
- "character_name, an Asian woman in a white dress posing at a beach"
Each prompt will be used to generate one sample image.
Training Command
After you are done with the config file, save it and use this command to start the training
python run.py config\character_lora_qwen_image_v1.yaml
It takes about 2 hours for 2000 steps on my RTX 5090. A directory will be created under output\character_lora_qwen_image_v1. The sample images are created under output\character_lora_qwen_image_v1\samples. Look at the sample images to determine which step has the best results. If you are not satisfied with the results, you can modify the config file and increase steps. Run the above command again, and ai-toolkit will continue training from the highest step LoRA in the directory.
Qwen-Image LoRA Example
One of the training data set images:
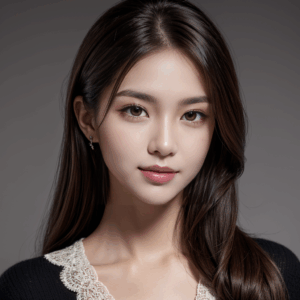
One image generated using the Qwen-Image LoRA:
![]()
Conclusion
Training a LoRA with Qwen-Image and ai-toolkit gives you a practical way to achieve high-quality, customized outputs without needing huge hardware or complicated workflows. With the right dataset and parameters, you can create a model that captures your desired look while fitting seamlessly into your existing image generation setup. Whether you want consistent character likeness, a unique art style, or more control over your outputs, this workflow makes it both achievable and efficient. With these tools, tailoring generative AI to your creative vision has never been easier.
Further Reading
Leave a Reply