I am working on a Dell OptiPlex GX400 which was rebuilt once. The machine freezes during boot process. I suspect that it’s a hardware related problem. I want to run the diagnostic utility to find out what’s wrong with the machine. However, the diagnostic partition is long gone. If you go to Dell’s support site, you can download the diagnostic program. You can then use the downloaded file to create a set of floppy disks (5 disks) for diagnosis.
If you’re thinking about purchasing a new GPU, we’d greatly appreciate it if you used our Amazon Associate links. The price you pay will be exactly the same, but Amazon provides us with a small commission for each purchase. It’s a simple way to support our site and helps us keep creating useful content for you. Recommended GPUs: RTX 5090, RTX 5080, and RTX 5070. #ad
My problem is that I don’t have 5 floppy disks. Even if I do have the disks, the whole process is long and tedious, I don’t want to do it. The other option is to find the Resource CD that came with the machine, so I can just boot the machine using the Resoucre CD and run diagnostice utilities. After searching my work place for a while, I did find some Dell’s OptiPlex Resource CDs. Unfortunately, they are for other models.
I decided to create my own bootable diagnostic CD using the Resource CD. Here is what I did.
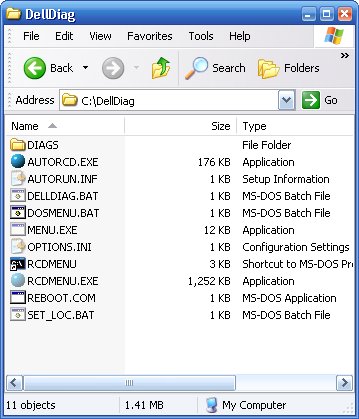
- Create a new directory on your hard drive (I use C:\DellDiag) and copy every files on the Resource CD’s root directory EXCEPT BOOT.CAT and BOOT.IMG. You’ll need BOOT.IMG later. You can copy it to other directory but not this one. Copy the DIAGS directory from the Resouce CD to this directory. When you are done, the directory list look like this.

Note that depending on the version of Resource CD you use, the files might be different. The one I used is P/N Y5835 Rev. A00 .
- Go to Dell’s support web site and download the diagnostic utilities for your machine. There are different download options, pick the option that says Hard-Drive.
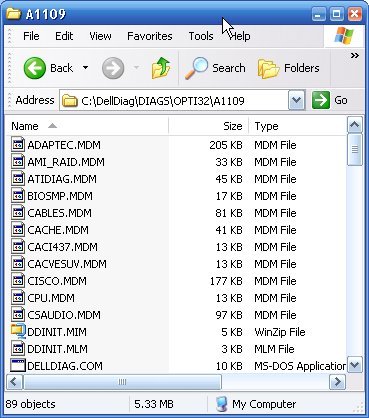
- Expand the DIAGS directory in C:\DellDiag, you see an OPTI32 directory (If you use an OptiPlex’s Resource CD) . Create a sub directory here. I name it A1109 to match the diagnostic utilities’ version. Extract the downloaded files from step 2 here. My final path is C:\DellDiag\DIAGS\OPTI32\A1109 . You don’t have to use the same path. You can use whatever path you want, just use the same path in the following step. My resulting directory looks like this.

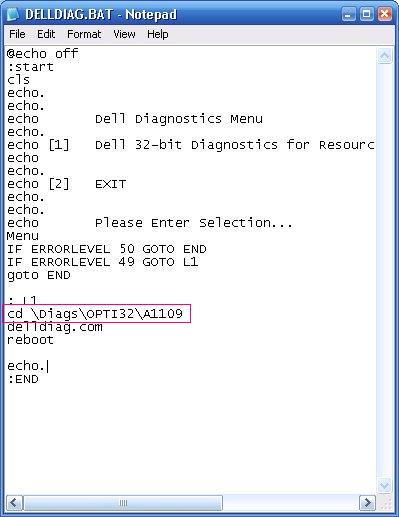
- Go back to C:\DellDiag and edit the DELLDIAG.BAT file. Find the cd line and modify the path. Change it to the directory you created in step 3. Remember to use relative path. In this case \DIAGS\OPTI32\A1109 .

- Now we can burn the files to a CD. The procedure differs a lot between different burning software. The idea is to create a bootable CD project. Put everything under C:\DellDiag to this project. Pick the floppy emulation option and use BOOT.IMG you found on Rescource CD as the floppy image.
Now you are ready to test the diagnostic CD. On a side note, I found that the machine’s problem is due to a bad audio card. The diagnotic utitlities didn’t test the external audio card so the CD isn’t very helpful to me in this case.
Thanks so much – very helpful and great step-by-step. Very appreciated.