MioMap (iGo) uses DATA.ZIP for a lot of user interface configurations. I have included the DATA.ZIP from my US Mio C230 in my unlocking guide. My reader found that the DATA.ZIP is not compatible with EU model. I am starting this post and record whatever tweaks I know for it. You can then modify your own DATA.ZIP file. I’ll keep updating this post, please come back from time to time to check on any new tweaks.
If you’re thinking about purchasing a new GPU, we’d greatly appreciate it if you used our Amazon Associate links. The price you pay will be exactly the same, but Amazon provides us with a small commission for each purchase. It’s a simple way to support our site and helps us keep creating useful content for you. Recommended GPUs: RTX 5090, RTX 5080, and RTX 5070. #ad
Before you go on and modify your DATA.ZIP. Make sure you always make a backup copy of it, so if anything happens, you can revert it to the original DATA.ZIP. Do the tweaks one by one and test it before you try the next one. Therefore, if something goes wrong, you know what the problem is. Make a backup copy of individual file before you modify it. The following tweaks have been tested on a US model of Mio C230.
BEFORE YOU FOLLOW THE PROCEDURES TO MODIFY YOUR MIO C230. YOU KNOW THAT YOU MIGHT RENDER YOUR C230 UNUSABLE AND YOU MIGHT VOID YOUR WARRANTY. YOU DO THIS AT YOUR OWN RISKS.
The DATA.ZIP file is at
My Flash DiskMioMapMioMap
or
My Flash DiskMioMapMioMap2
if you use my unlock prior to release 4. To modify a file inside DATA.ZIP, first extract everything to your hard drive. Work on the file that you are interested in and compress every files back to DATA.ZIP again. If you have problems running MioMap after you modify your DATA.ZIP file. Here are some trouble shooting tips:
- Make sure you compress the files in the same directory structure and you didn’t introduce additional folders.
- It has been reported that file compressed by WinZip 11 is not working. Please use other applications for zipping.
- If you do a cut and paste when editing the file, additional line break might be in the edited file. Try to edit the entry by hand.
Exit Door Button *
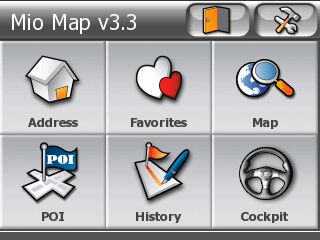
This is a must for any unlocks. By default, there is no Exit Door at the main screen. This tweak “unhides” the Exit Door button. First edit the file miocommonuidefault_setup.ui . Find the following line.
runif vDeviceType "MIOC230" 'btn_exit_app.hide'
Comment out the line by putting a semicolon before it. Now the line looks like this.
;runif vDeviceType "MIOC230" 'btn_exit_app.hide'
Note that this is for Mio C230. You might try to edit/delete other line for your specific model.
Export Track Button *

This tweak unhides the Export button in the Track Information screen. Edit this file mio320_240uitracking_320_240.ui . Find the word hide and delete just the word hide.
Easy Route Option *
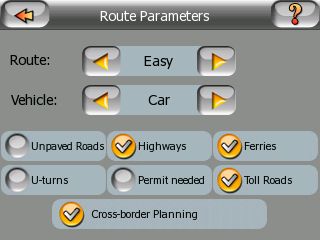
This tweak enables EASY route option. The route planned requires less turns than other route options. Edit this file mio320_240uiroute_settings_320_240.ui . Find this line
<SLIDER btn_config1 var=vRouteType value="Fastest|FAST|Shortest|SHORT|Economic|ECO" x=82 y=46 w=76 bmp="sel_left.bmp#2" fonttype=buttonlabel1 bmp2="sel_right.bmp#2" align="center" valign="center+5" enablekeys=0>
and change it to
<SLIDER btn_config1 var=vRouteType value="Easy|SIMPLE|Fastest|FAST|Shortest|SHORT|Economic|ECO" x=82 y=46 w=76 bmp="sel_left.bmp#2" fonttype=buttonlabel1 bmp2="sel_right.bmp#2" align="center" valign="center+5" enablekeys=0>
Do not do a copy and paste for this tweak, because you might have an extra line break in the file.
* – These tweaks have been included in my unlock release 3.1.
GPS Power Button
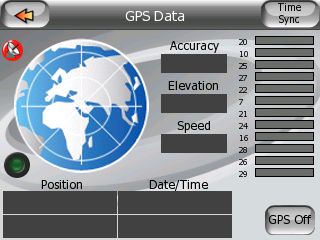
This hack enables you to turn off GPS power when you are planning a route or viewing the map. There are two files involved to pull this off. The first file is commongps.ui . Insert the following 3 lines in the <script sc_gpssettings_init> section.
	;!TB - show or hide ON and OFF buttons

	run sc_gps_switch_btn_update

	vGPSStatus.OnChange "sc_gps_switch_btn_update"
Then add the following to the end of the file.
;!TB - start and stop GPS scripts

<script sc_gps_stop>

	gps_stop

	btn_gps_off.disable

</script>

<script sc_gps_start>

	gps_start

	btn_gps_on.disable

</script>

;!TB - update GPS on and off buttons

<script sc_gps_switch_btn_update>

	runif vGPSStatus 0 'btn_gps_on.show, btn_gps_off.hide, btn_gps_on.enable'

	else_run 'btn_gps_off.show, btn_gps_on.hide, btn_gps_off.enable'

</script>
The second file is mio320_240uigps_320_240.ui . Insert the following into the <layer ui_settings_gps> section.
;!TB - Added On and Off GPS buttons

<BUTTON btn_gps_off x=265 y=205 z=1000 bmp="btn_set.bmp#2" text="GPS Off" color=#000000 fonttype=buttonlabel1 fontsize=12 onrelease='run sc_gps_stop' valign="CENTER+4">

<BUTTON btn_gps_on x=265 y=205 z=1000 bmp="btn_set.bmp#2" text="GPS On" color=#000000 fonttype=buttonlabel1 fontsize=12 onrelease='run sc_gps_start'  valign="CENTER+4" hide>
When you copy the previous lines, make sure you copy the whole lines.
Switch View Button (Cockpit <-> Map)
When I used the default skin, I always wish there is a button to switch between map view and cockpit view easily. People trying out riks skin found that there is a button which does just that. With this example in mind, I was able to modify the original skin to add the button. This tweak is the most complicated so far. You also need some bitmap files for the icon. Here are the modifications needed.
File: mio320_240uinavigate_320_240.ui
Modification: Add the following to the end of the file.
; script handling switch view button map -> cockpit - computerbits.wordpress.com

<script riks_switch_to_cockpit>

	btn_switch_view_cockpit.hide

	btn_switch_view_map.show

	NEXTSTATE ST_NAVIGATE

</script>

; script handling switch view button cockpit -> map - computerbits.wordpress.com

<script riks_switch_to_map>

	btn_switch_view_cockpit.show

	btn_switch_view_map.hide

	NEXTSTATE ST_BROWSEMAP

</script>
File: mio320_240uimap_layers_320_240.ui
Modification: Insert the following to the <LAYER ui_gpsstatusonmap> section.
; add swtich view (cockpit <-> map) button - computerbits.wordpress.com

<BUTTON btn_switch_view_cockpit  x=249 y=24 z=2 bmp="$cockpit.bmp" alpha=20 onclick='run riks_switch_to_cockpit'  >

<BUTTON btn_switch_view_map x=249 y=24 z=2 bmp="$map.bmp" alpha=20 onclick='run riks_switch_to_map' >

<SPRITE btn_switch_view     x=249 y=24 z=1 bmp="$circle.spr" alpha=20 fontsize=12 color=#808080 >
File: commonbrowse.ui
Modification: Insert the following 3 lines to the <script init> section.
; show the correct switch view icon - computerbits.wordpress.com

btn_switch_view_cockpit.show

btn_switch_view_map.hide
File: commonnavigate.ui
Modification: Insert the following 3 lines to the <script init> section.
; show the correct switch view icon - computerbits.wordpress.com

btn_switch_view_cockpit.hide

btn_switch_view_map.show
We also need the bitmap files for the icons. You can download the files in a zip file here. I compressed the files in correct folder order. If you uncompress the file to your DATA.ZIP working folder, the files will go to the right locations. Just in case you did not get it right, the locations for these icons are at miocommondaylight and miocommonnight.
Fast Fly-Over
1/29/2008
Before I tried the various new skins, I thought fast fly-over can only be achieved by modifying the SYS.TXT file. Later, I found that this is not true. You can actually choose to do the regular fly-over or fast fly-over without modifying the SYS.TXT file. Here is how.
File: commonmap_common.ui
Modification: Add the following scripts to the end of the file.
<script fly_over_speed>

         run vCockpitCurrentQuickMenuCloseScript

         FINDPATH_SIMULATE 0

         vStopFlyoverOnDone.set 0

         STATE ST_NAVIGATE

</script>

<script fly_over_slow>

         run vCockpitCurrentQuickMenuCloseScript

         FINDPATH_SIMULATE 1

         vStopFlyoverOnDone.set 0

         STATE ST_NAVIGATE

</script>
File: mio320_240uimap_layers_320_240.ui
Modification: Modify the line
<BUTTON btn_route_flyover w=105 x=202 y=65 z=2 text="Fly Over" font="tahomabd" valign="BOTTOM-6" align="RIGHT-8" bmp="btn_go_clr_7.bmp#3" fontsize=12 color=#444444 onrelease='run vCockpitCurrentQuickMenuCloseScript, FINDPATH_SIMULATE 1, vStopFlyoverOnDone.set 0,STATE ST_NAVIGATE'>
so that it’s like this.
<BUTTON btn_route_flyover w=105 x=202 y=65 z=2 text= "Fly Over" font= "tahomabd" valign="BOTTOM-6" align="RIGHT-6" bmp="btn_go_clr_7.bmp#3" fontsize=12 color=#444444 onrelease='INITMESSAGEBOX 2 "Fast Fly Over?" fly_over_speed fly_over_slow' twolineoffset=-8>
[Update: 2/14/2008] I have uploaded a DATA-ComputerBits.zip file to here. It has all the hacks mentioned in this post. Just rename it to DATA.ZIP and put it in the folder where MioMap.exe is.

Find deals on Amazon.com
Is there a route style like other NAV units have which combines short and fast for optimal?
Thanks
Ken,
You can adjust that in the settings->route window.
Firstly, Can i exchange the com port to com 1? Because there are some other map which using the com 1 not original mio com port2.
Secondly, Is there any way to install the windows mobile 5 or 6 into c230. The way is much better and easy to use any applications with c230 with PDA function. Thanks for your help.
Steven,
I don’t think changing com port to com 1 would do you any good, since the GPS is at com 2. To install WM 5 or 6 requires flashing the internal ROM. I doubt it would be possible to do so.
According to the tools I’ve used, COM1 is already reserved for TMC anyways.
Cool on the GPS POWER BUTTON Amida168! I can’t wait to try it.
Amida168,
The instructions work fine however the “The first file is common\gps.ini” should be changed to filename “gps.ui”
Change it then delete this reply.
Amida,
That is fantastic! This is better than what I expected as we won’t even have to write a menu script for this outside of MioMap. Thanks for posting!!
Amida, thanks for providing more tweaks to this great device…
Attempting to follow your instructions for the Switch View Button, but receiving the following error:
Failed to open file: ctype.dat exiting application.
Are there any specific points to place the modified lines in the last three files, is it something that perhaps is out of order, or as long as they are in correct section, it should work?
Have a backup so not worried, just wanted to get this working on the default skin setup… Thanks in advance!
Gato
Gato,
Speaking from personal experience, that error comes from the uncompression / recompression of the ctype.dat file, which doesn’t always work well. You are better off sliding the ui file you are tweaking to your desktop, make your changes and then sliding that file back into it’s spot in the data.zip window. That way, only that particular file is recompressed back into the folder.
I’ve seen mentioned that ctype.dat could even be taken out of the data.zip and placed uncompressed in MioMap\MioMap2 to avoid these errors, but I haven’t confirmed that this works.
Gatolives,
What zip utility you used and what is your computer’s operating system? I use WinZip 9 on Windows XP and Vista. Have you done this before? If so, did it work last time? I am trying to figure out what’s the cause of the problem.
You can insert the three lines near the end of the section. DATA.ZIP is very sensitive to errors. A single typo would cause MioMap fail to load.
C230,
Thanks for your suggestion.I have tried to keep everything in DATA.ZIP and only work on the files I am interested in and zip it back to the file. However, sometimes the file I modified didn’t zip to the correct folder, so I still prefer to unzip everything to a working folder first. Again, it could be due to WinZip 9. If you use other utilities, it might be the way to go.
Hy
I modify data.zip, more exactly directory rename”480_272″ with “320_280” and it give me “Fattal error occured, restarting”. From there on i can`t use my mio c220 anymore. I didn`t find any solution to put him back to live.it runs till it give mee the error and then rit restarts, and over and over till battery dies. With mio transfer hack i don-t have suficient time cu del data.zip, olso i`ved tried to restore mio software with dvd from the factory, it say that i don-t have enought space. I found a scrip witch run win ce file manager, i`ved it it sturts file manager but it`s restart also it doesn`t stay in file manager.can someone leave me some messages with solution in my email(larioan@yahoo.com)? i will apreciate his efort.
Arteka,
I am sorry to hear that. These tweaks are tested on C230 only. Maybe you could restore your original DATA.ZIP file. Other than that, I don’t know how to help you. You might want to go to http://www.mionav.com and ask how can you restore your C220.
Amida, C230, thank you for your prompt responses…
I had been using Winzip 10 for all the other tweaks but after reading your suggestions decided to use a program which I had read about earlier on here somewhere, (not sure who mentioned it, but it did stick out in my mind) called 7zip. It allows you to open the archive, make any changes and just update the file in the zip without having to do any compression to the whole file… Worked great, switch view buttons are now in place!
Thanks again!
Gato
I struggled a bit tonight enabling the GPS Power Button on my C230. In the end it came down to a missing > in \common\gps.ui
One remaining problem. On my GPS screen the TMC and CONFIG buttons are still displayed, and the GPS Power Button is mostly behind the CONFIG button. Been playing around with this for several hours but have not been able to make them disappear. I would not miss TMC but perhaps access to CONFIG would be useful?
Can anyone point the way to resolving this? Thanks,
Dana
Dana,
I think you might have accidentally delete this line
runif vPNA 1 ‘btn_s_config.hide, btn_s_detect.hide’
from script sc_gpssettings_init section of common\gps.ui . If this still doesn’t work, I’d suggest you use the original DATA.ZIP and start over again. Good luck.
Thanks for the suggestion. Here is what that section looks like after I woorked on it:
;!TB – show or hide ON and Off buttons
run sc_gps_switch_btn_update
vGPSSTATUS.OnChange “sc_gps_switch_btn_update”
register_gpstime_display l_date 0 1
register_gpstime_display l_time 1 1
register_position_display l_location1 l_location2
register_gpsaux_display l_kmph 0 l_elevation l_accuracy spr_compass
register_satellite_display “l_sat” “sat” “l_prn” “spr_prn”
register_status_display spr_settings_gps_status 3
register_status_display spr_settings_gps_progress 1
spr_hdr_bg.bmp “gps_bg.bmp”
btn_s_config.onrelease ‘nextstate STF_GPSSETTINGS_CONFIG’
title.set “GPS status”
btn_s_detect.hide
btn_s_config.show
runif vPNA 1 ‘btn_s_config.show, btn_s_detect.hide’
AND, at the end of gps.ui:
;!TB – start and stop GPS scripts
gps_stop
btn_gps_off.disable
gps_start
btn_gps_on.disable
;!TB – update GPS on and off buttons
runif vGPSStatus 0 ‘btn_gps_on.show, btn_gps_off.hide, btn_gps_on.enable’
else_run ‘btn_gps_off.show, btn_gps_on.hide, btn_gps_off.enable’
Does that look right?
The DATA.ZIP is from the olivercp skin. So there could be something in that which is interfering, if I haven’t made a mistake following the instructions. The power button is present so I did something correctly. And I can actually activate the power button where it peeks out from under the CONFIG button, so this is not a complete failure. Just the original buttons are not disabled.
Sooooo…. I can do this hack using the original DATA.ZIP. If it works properly I can assume the DATA.ZIP for the olivercp skin is causing a problem.
I have tried to parse out how the TMC and CONFIG buttons are configured to get a clue how they are disabled but I don’t understand this stuff well enough at present.
Is this the problem child?
runif vPNA 1 ‘btn_s_config.show, btn_s_detect.hide’
Sorry, should have thought a minute.
Is this the problem child?
runif vPNA 1 ‘btn_s_config.show, btn_s_detect.hide
when it should be
runif vPNA 1 ‘btn_s_config.hide, btn_s_detect.hide’
Is that correct?
Looking at the original gps.ui it appears that
runif vPNA 1 ‘btn_s_config.show, btn_s_detect.hide
must be a modification for the olivercp skin… so I will find out soon enough if it breaks something in the skin.
Dana,
For factory skin, we don’t want config and detect buttons shown. Therefore, we hide the buttons.
runif vPNA 1 ‘btn_s_config.hide, btn_s_detect.hide’
For OliverCP screen, you can also change the x and y, so that the button can be in a better location.
Thanks for that Amida. Olivercp suggested the same solution and I like that. Obviously he made a tweak that effected the expected behavior. But now I can leave it be and just re-position the gps power button. Best of both worlds I suppose.
Every time I think I’m done fiddling with my C230, someone comes up with something else cool I just have to have. Thanks to everyone for the good work.
Amida,
What special thing did you do to get the cockpit.bmp and map.bmp files from here to work transparently with the circular button area?
I’ve tried creating my own 30×30 bmp files to replace these but my graphics always display as square and don’t automatically display inverse in night-time mode. But the ones you supplied stay inside the circle and auto-invert at night. Plus when I look at your bmp’s in Paint, they look funky but in MioMap they look right. What gives? What’s the special sauce?
(The reason I’m trying to create my own bmp’s is that I want the buttons to match the monochrome color-scheme of the existing buttons on the cockpit and map screens.)
Tim Rude
I am wondering if anyone has tried to use the tweak for the Switch View Button with the olivercp skin for the Mio C230?
Tried to do that tonight, but when the mainscreen tries to load I get an FFUIERROR: Code 8
Maybe it just won’t work with this skin. I’ve checked for errors in the lines added but have not found any yet. Does the position of the added lines in , for instance, have any impact on whether it will run properly? I’ve been adding them at the bottom of the appropriate section.
Just another late night up, trying to break my Mio.
Dana
Tim,
I didn’t create those bitmaps. I think you need some graphic software that can generate transparent background. In order to have an inverted image for night view, you just have to do an inverted version and pop it to the night folder.
Dana,
If you go to my Mio Skins page, there is already a link to OliverCP skin that has the switch view button.
Amida,
The newest version of the skin solved my problems with Switch View. Right now I’m trying to move that button to my preferred location. Getting close. I really could use a grid map of the screen to help placement. Had to add the GPS power button back to the updated skin. But things look pretty good at the moment. Thanks for the help and many thanks for the good work.
Dana
Dana,
You are welcome. Hope you don’t loose too much sleep tweaking your C230. 😉
Hah! I’m done fiddling with my Mio, it is just the way I want it with many cool new features…
until something comes along I can’t resist. Probably tomorrow the way things have been going.
4 hours of sleep, that’s what I average when I start tweaking. And that is why I think I am done for a while.
Dana
Amida,
I’m happy to report that Mike FFI was apparently on the right track regarding his proposed solution to proper TTS behavior to the former C220 skins you’ve published. Rather than replace just the guidance.dat file though, I replaced the entire config folder from my C230 skin into CD’s enhanced Quicksilver Reborn skin (which was another former C220 skin that didn’t announce roundabouts properly) and all seems well now. Perhaps you’ll consider doing the same for your skins and republish.
This was probably the best way to insure we’ll get consistent behavior between the skins as well.
c230, Dan, Ameridan
c230,
Thanks for the suggestion. I’ll try that and re-publish the skins when I get a chance. BTW, this comment should be in the MioMap Skins post. This post is for tweaking the factory DATA.ZIP .
OOPS, sorry. Can you cut and paste or do you want me to copy them into the other post so you can delete form here?
Amida,
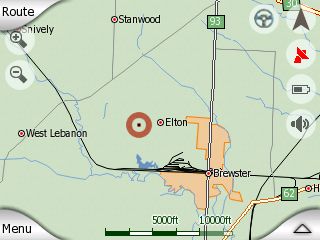
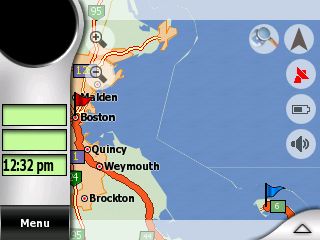
thanks for the great work. I use c230 in Europe and would like to alter the skin in such a manner that no speed limit ist displayed in the lower left map corner in cockpit mode. The displayed speed limit is in town most of the time wrong and should not be present. Can you suggest a change to get it of? The picture above does not show the limit either. Did you already solve this issue?
Thanks and br Alto
Alto,
You are welcome. You can disable the speed limit by editing the SYS.TXT in the MioMap (or MioMap2) directory. Add the following to the [debug] section.
show_speed_limit=0
Amido,
thanks, this mod in sys.txt works fine!
Amida thanks for your great guide on unlocking and tweaking the mio 230. Your page was the first I found (after seeing you video on youtube) and it helped very much.
I tried to add the Switch View Button and Fast flyover tweaks to my data.zip but mio refuses to load. I tried the modifications twice and also tried three zip utilities (wizip 11, winrar and 7zip) but none of them worked. I have a backup of course so no problem. Maybe I’ll try again tomorrow although I’m pretty sure I didn’t omit anything.
Anyway what I’d like to see if a tweak on how to add a route recalculation button that is present on some skins (changes the route parameters). I’m pretty happy with the default skin, but this is a must. Any help here ?
Thanks
Mythos,
You are welcome. I am glad that you found my guides useful. Modifying DATA.ZIP is kinda tricky. I have make my DATA.ZIP available for download. If you have a US model, you can just download it. The link is at the bottom of the post.
I have tried to add the route recalculation button, but I failed. It seems like a lot of works. I don’t know enough to make that possible for default skin. 🙁
It’s ok, I finally tried the split screen theme and it’s great. I hadn’t tried it before because I thought it removed the cockpit view and forced the split screen which would be bad for the small screen of the mio. But since it’s selectable (and includes all the fine tweaks) I must say it’s great. Congratulations to whoever created it.
Amida,
Thanks for all the interesting tweaks, and when I get an opportunity, I plan to dive in and hack my 230. In the meantime, I’m looking for something to make my routes more accurate. My unit is v3.3, was built in 8/07, and uses TeleAtlas N.V. [070717] map. Isn’t there something I can do to update this map? I’m in Los Angeles, and testing on routes that I know well. However, my C230 will give me such an out of the way route, that I wonder if it is defective. I’ve seen others post similar frustrations.
Does an upgraded map exist?
Is it possible to get the desired results through your Easy Route Option?
Thanks again!
Scratch,
Easy route option plans a route with less turns. If you don’t like the route planned, you might want to try adding via points to edit the route.
Tnxs for the tweak. But i’ve got a question.
In the 3.2 skins sometime the arrow is a car. Has someone a tweak for this?
"An onscreen button to allow our C230 to Show the entire route instead of having to tap 3 times".
Modification has to be done to the \mio\navigate_320_240.ui
search for "<layer ui_navigate_static_left>"
and modifiy the clause after the first sprite instruction (addings in bold):
<SPRITE xxx x=0 y=0 z=0 bmp="whitestripe.bmp" onrelease=’NEXTSTATE ST_MANAGE_ROUTE, run sc_common_fitroutetoscreen_cockpit’>
Now by clicking on next road name in top of the screen, you access to the view of the entire route.
The V7 series (NAV730 same screen size as Mio C310x) of GPS has one of the best skins of iGo2006. I having been trying to make it work in my Mio C310x without much lunch. Can you help?
V7 informaton:
http://www.v7-world.com/aeef49b5-9bcd-11db-aaed-00304856c39e?action=category_show&category_id=d8c81309-906c-11db-9c96-00304856c39e
V7 Files can be downloaded here:
http://v7support.com/V7GPS/Updates/USA/
My post on pda4x.com
http://www.pda4x.com/read.php?tid=62036&page=e&#a
I forgot to mark the bold text. This should make it more clear on what and where to add
"An onscreen button to allow our C230 to Show the entire route instead of having to tap 3 times".
Modification has to be done to the \mio\navigate_320_240.ui
search for "<layer ui_navigate_static_left>"
and modifiy the statement after the first sprite instruction (add whats marked in bold):
<SPRITE xxx x=0 y=0 z=0 bmp="whitestripe.bmp" onrelease=’NEXTSTATE ST_MANAGE_ROUTE, run sc_common_fitroutetoscreen_cockpit’>
Now by clicking on next road name in top of the screen, you access to the view of the entire route.
QuickSilver13,
That’s great! Thanks for your contribution and helping out. I finally finished my new release. I am going to test this.
hello,
i just bought a new mio C230 in the EU (holland).
For some reason the speed limit option is not available in the europe version?
Does somebody now how you can turn it on?
i have tried different thing, but notthing
seems to work.
Thanks already.
I mean the overspeed option.
my mistake.
can voice be changed in the data.zip? I have some voices for tomtom and was wondering if it can be added/overwrite to the data file?
Mr Holland,
The setting might be hidden from you. You can try to unzip the DATA.ZIP file of yours and look for the word hide in \mio\320_240\ui\settings_320_240.ui and \common\settings_common.ui .
KiloJinx,
Voice is not in DATA.ZIP. I haven’t tried to hack the voice of Mio, therefore I don’t know much about it.