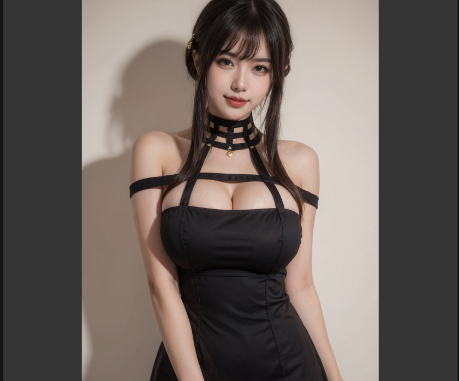
MiniMax H3 is one of the most capable open-weight AI video generation models available today, offering high-quality image-to-video generation with native audio support. Thanks to GGUF quantization, the model can now run locally on a wider range of hardware while significantly reducing memory requirements without sacrificing much visual quality.
If you’re thinking about purchasing a new GPU, we’d greatly appreciate it if you used our Amazon Associate links. The price you pay will be exactly the same, but Amazon provides us with a small commission for each purchase. It’s a simple way to support our site and helps us keep creating useful content for you. Recommended GPUs: RTX 5090, RTX 5080, and RTX 5070. #ad
In this tutorial, you’ll learn how to use the MiniMax H3 Image-to-Video GGUF workflow in ComfyUI. We’ll walk through downloading the required models, loading the workflow, configuring the essential nodes, and generating your first AI video from a single image. Whether you’re creating cinematic scenes, AI influencers, or animated artwork, this guide will help you get MiniMax H3 running quickly on your local machine.
MiniMax H3 Models
- GGUF Model: The GGUF models can be found here. I have a RTX 5090, and I used the Q5_K_M variant. I downloaded MiniMax-H3-Ref2VA-Q5_K_M.gguf. If you have less VRAM, use other variants like Q3 or Q4. Put the GGUF models in ComfyUI\models\unet\ .
- Text Encoders: Download qwen3vl_32b_minimax_h3_nvfp4_awq.safetensors; put it in ComfyUI\models\text_encoders\ .
- VAE: Download minimax_h3_video_vae_fp16.safetensors and minimax_h3_audio_vae_fp32.safetensors, put them in ComfyUI\models\vae\ .
Installation
- Update your ComfyUI to the latest version if you haven’t already. (Run update\update_comfyui.bat for Windows).
- Download the json file, and open it using ComfyUI.
- Use ComfyUI Manager to install missing nodes.
- Restart ComfyUI.
MiniMax H3 ComfyUI Workflow Supports More Than Image-to-Video
Although this tutorial focuses on MiniMax H3 Image-to-Video, the ComfyUI workflow is more flexible than the name suggests. With a few simple changes, the same workflow can be used for multiple video generation modes, including Text-to-Video and First Frame/Last Frame generation.
Text-to-Video (T2V)
To convert the workflow into a Text-to-Video workflow, simply disable the image loading node. Without an input image, MiniMax H3 will generate the video entirely from the text prompt.
This allows you to create complete scenes from a description, including camera movement, characters, environments, and cinematic effects.
Image-to-Video (I2V)
The default workflow uses a single input image as the starting frame. MiniMax H3 uses the image as visual guidance while following the text prompt to animate the subject, add motion, and create a dynamic video sequence.
This mode is ideal for animating AI artwork, character portraits, product images, and photography.
First Frame / Last Frame to Video
MiniMax H3 also supports first-frame and last-frame guided video generation. By adding a second image input, the workflow can use one image as the starting point and another image as the ending point.
The model will generate the transition between the two images, creating a smooth animation that connects the beginning and ending scenes.
This is especially useful for:
- Character transformations
- Before-and-after animations
- Camera movement between two compositions
- Storytelling sequences
- Product showcase videos
The ability to switch between T2V, I2V, and first-frame/last-frame workflows makes MiniMax H3 much more versatile than a typical image animation model. Instead of maintaining separate workflows for each generation method, users can adapt a single ComfyUI workflow depending on the desired result.
MiniMax H3 Nodes
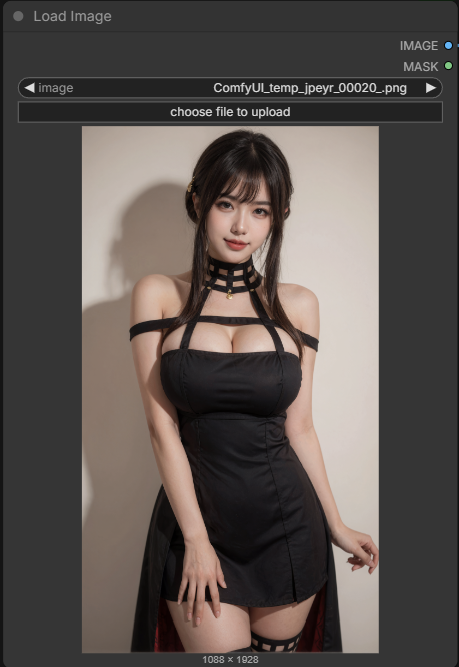
This is where you upload an image to be used as the first frame. If you disable this node, the workflow becomes a text-to-video workflow.
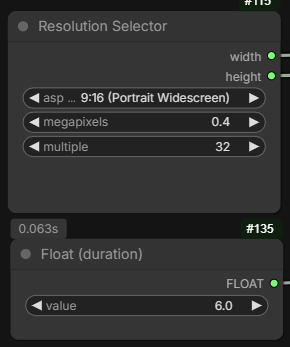
Specify the size and duration for the video. The duration is in seconds.
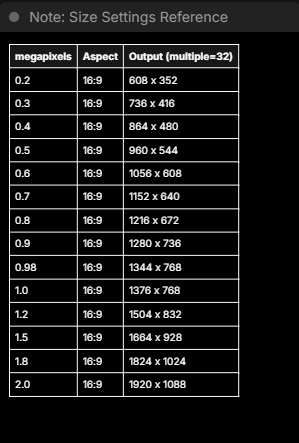
This is a look up table to show the size settings reference.

Pick the GGUF model file you downloaded.
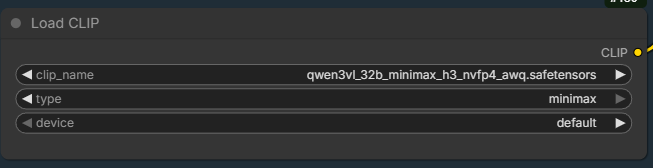
Text encoder.
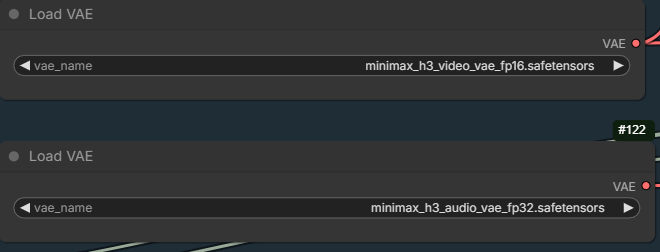
The 2 VAEs. The top one is video VAE and the bottom one is audio VAE.
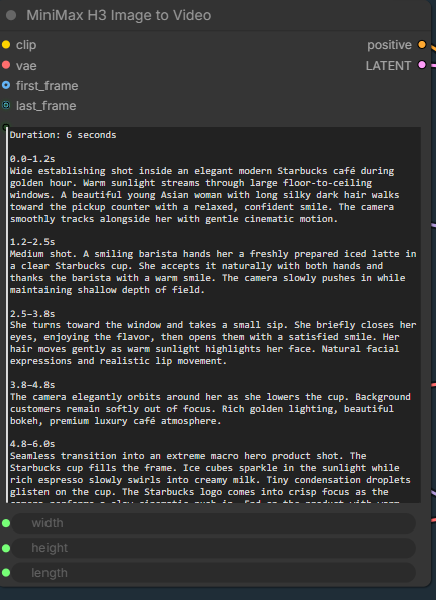
Enter the prompt here. Note that the node has an input for last frame. If you add a load image node to the workflow and link to the last frame. The workflow becomes a first frame last frame to video workflow.
Examples
Image-to-Video
Input image:
Prompt:
Using the provided image as the first frame.
Duration: 5 seconds.
Woman in Yor’s outfit stands confidently. She slowly turns her body toward the camera, crosses her arms with a subtle smile, then uncrosses them and leans in slightly as if sharing a secret. Hair and clothing move naturally.
Dialogue (English):
“Don’t worry… I’ll handle everything.”
Audio:
Calm, elegant female voice with slight confidence. Soft wind ambience. Quiet fabric movement. No music.
Output:
Text-to-Video Example
Prompt:
Duration: 6 seconds
0.0–1.2s
Wide establishing shot inside an elegant modern Starbucks café during golden hour. Warm sunlight streams through large floor-to-ceiling windows. A beautiful young Asian woman with long silky dark hair walks toward the pickup counter with a relaxed, confident smile. The camera smoothly tracks alongside her with gentle cinematic motion.
1.2–2.5s
Medium shot. A smiling barista hands her a freshly prepared iced latte in a clear Starbucks cup. She accepts it naturally with both hands and thanks the barista with a warm smile. The camera slowly pushes in while maintaining shallow depth of field.
2.5–3.8s
She turns toward the window and takes a small sip. She briefly closes her eyes, enjoying the flavor, then opens them with a satisfied smile. Her hair moves gently as warm sunlight highlights her face. Natural facial expressions and realistic lip movement.
3.8–4.8s
The camera elegantly orbits around her as she lowers the cup. Background customers remain softly out of focus. Rich golden lighting, beautiful bokeh, premium luxury café atmosphere.
4.8–6.0s
Seamless transition into an extreme macro hero product shot. The Starbucks cup fills the frame. Ice cubes sparkle in the sunlight while rich espresso slowly swirls into creamy milk. Tiny condensation droplets glisten on the cup. The Starbucks logo comes into crisp focus as the camera performs a slow cinematic push-in. End on the product with warm golden bokeh in the background.
Audio:
Soft relaxing lo-fi music with mellow piano, acoustic guitar, and subtle vinyl texture. Authentic café ambience including quiet conversations, espresso machine steaming, milk frothing, coffee grinder, cups gently clinking, and distant footsteps. Realistic ice cubes shifting inside the cup as she lifts it, followed by subtle sipping sounds and gentle placement of the cup on the table. No dialogue.
Style:
Premium luxury coffee commercial, ultra-realistic, cinematic color grading, natural human motion, realistic skin texture, authentic café atmosphere, professional advertising cinematography, shallow depth of field, smooth gimbal camera movement, 35mm cinematic look for character shots, 100mm macro lens look for the product shot.
Output:
First Frame Last Frame to Video Example
Input images:
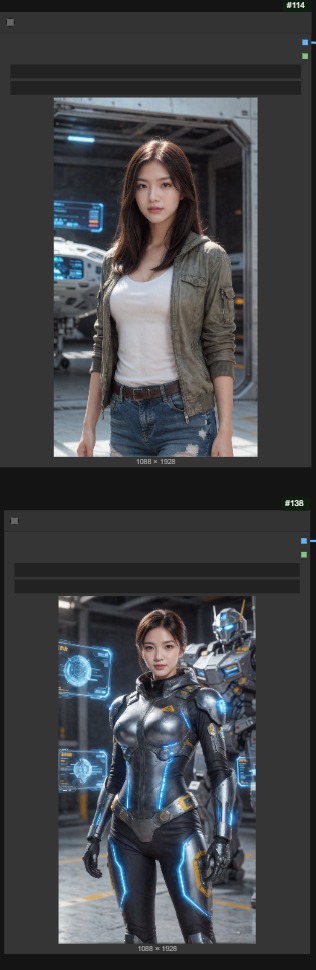
Prompt:
A realistic anime-inspired sci-fi transformation. A young woman transforms into an elite mecha pilot. Her elegant outfit changes into a futuristic pilot suit with glowing interfaces and advanced armor elements. A giant humanoid mecha appears behind her as the environment changes into a futuristic hangar filled with technology and holographic displays.
She turns toward the camera with confidence as the transformation finishes.
0.0–1.5s
Starting frame: girl standing in the futuristic hangar.
Subtle movement: hair sway, breathing, ambient lights flicker.
1.5–5.5s
Transformation sequence:
– holographic scan passes over her body
– futuristic armor components materialize
– pilot suit forms layer by layer
– glowing energy lines activate
– background technology comes alive
5.5–8.0s
Final frame:
– completed mecha pilot suit
– camera slowly pushes in
– she looks confidently at the camera
– giant mecha powers up behind her
Audio:
Japanese anime mecha transformation style. Begin with a quiet futuristic electronic melody and ambient spaceship sounds. A scanning beam activates with digital chimes, followed by mechanical armor assembly sounds, hydraulic movements, and glowing energy effects. The music builds into an emotional heroic theme as the transformation completes. Finish with a dramatic impact sound and powerful mecha engine activation.
No voice, no dialogue.
Output:
Note that MiniMax H3 also has a model dedicated to first frame last frame to video (MiniMax-H3-FL2VA-QXXXX.gguf). You can find those in the same directory mentioned before. You are encourged to try them out.
Conclusion
MiniMax H3 GGUF makes high-quality local image-to-video generation more accessible by combining efficient quantization with ComfyUI’s flexible node-based workflow. With support for multiple GGUF quantization levels, you can choose the best balance between image quality, generation speed, and VRAM usage based on your hardware.
Once you’re familiar with the basic workflow, you can further enhance your videos by experimenting with prompts, camera movement, audio generation, and different quantization variants such as Q5_K_M or Q8_0. As ComfyUI continues to improve support for MiniMax H3, it is quickly becoming one of the best open-source solutions for creating realistic AI videos locally.
Leave a Reply