
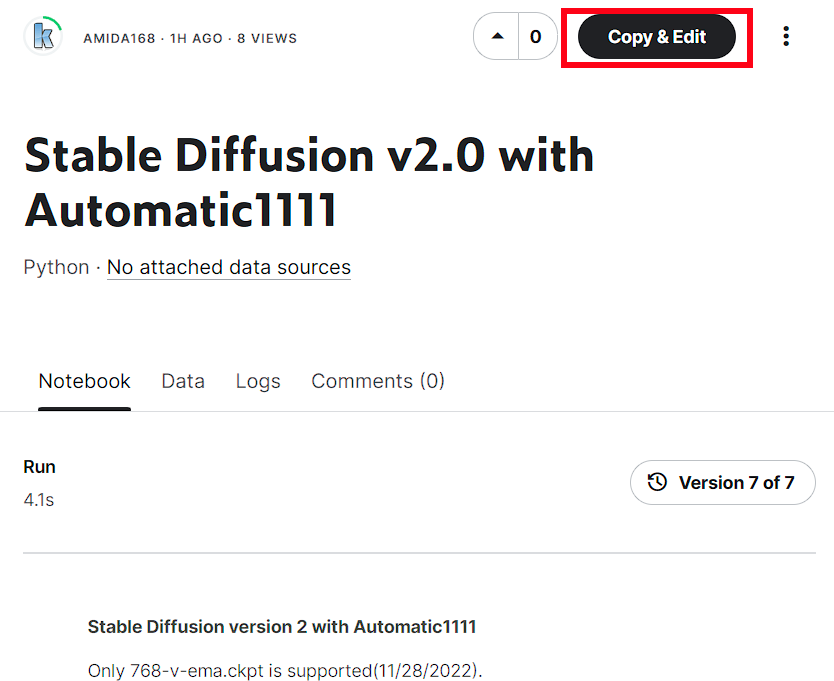
Stability AI annouced Stable Diffusion 2.0 last week. I modified one of my Kaggle notebooks to use the new version with Automatic1111. For those who are familiar with Kaggle. Here is the link to the notebook:
If you’re thinking about purchasing a new GPU, we’d greatly appreciate it if you used our Amazon Associate links. The price you pay will be exactly the same, but Amazon provides us with a small commission for each purchase. It’s a simple way to support our site and helps us keep creating useful content for you. Recommended GPUs: RTX 5090, RTX 5080, and RTX 5070. #ad
https://www.kaggle.com/amida168/stable-diffusion-v2-0-with-automatic1111
If you are new to Kaggle, please read on. I am going to share my experience.
According to the Wiki page: “Kaggle, a subsidiary of Google LLC, is an online community of data scientists and machine learning practitioners.” Their service is completely free. Each week, you have 30 hours of GPU quota allocated to you for free. I am not a heavy user, so 30 hours is enough for me. You can use Google Cloud Platform with Kaggle if you need more computing resources.
To start using Kaggle, visit their signup page and create an account. You can register using your Google account or your email. Once you are registered and logged on. The first thing you need to do is to verify your phone number. Note that this is very important. Without verifying your phone number, you won’t be able to use the GPU. You can verify your phone number by clicking on your avatar on the top right corner and then click on Account.

Scroll down a bit and you can see the link for phone verification.
Once registered, you can visit the notebook link: https://www.kaggle.com/amida168/stable-diffusion-v2-0-with-automatic1111 . Click on Copy & Edit to save a copy to your account.
Before you try to run the notebook, make sure the side bar is visible. If not, click on the icon on the top right corner to toggle it.
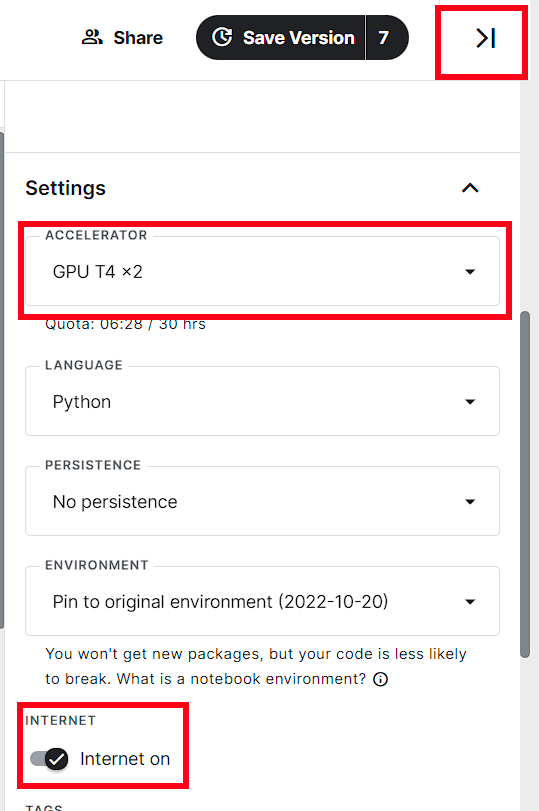
Expand Settings and set the Accelerator to GPU T4 x2 and turn on Internet. Your notebook is ready to run now. Start the session and run the first code block. Note that this step takes a long time depending on the server load and the network traffic. At the time of writing, the hugginface server was experiencing high traffic load. If you see a time out error, you might want to try again later.

Click on the gradio link and you will see the Automatic1111’s web UI. Note that this link is generated randomly. Yours will be different.
![]()
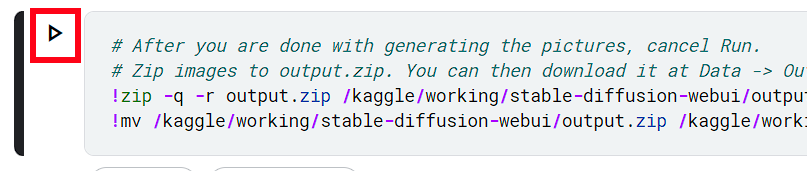
After you are done generating the images, click on Cancel Run to stop the first code block.

If you would like to save the images, run the second code block.
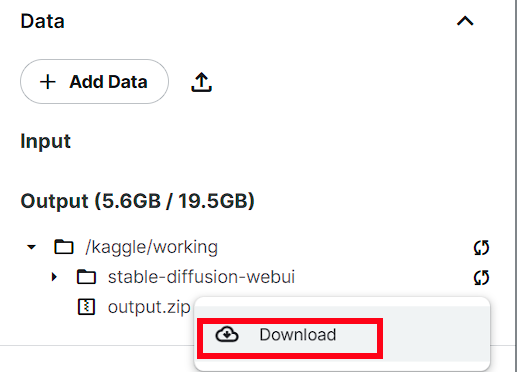
You can click on the 3 dots beside output.zip and select Download to save the file to your local computer.
Lastly, don’t forget to stop the session when you are done. Otherwise, you will use up your GPU quota quickly.
Hi, just discovered site/blog (the first site I finally found a simple recipe for using LORA files in Automatic — thanks). Wanted to ask about the notebook provided here, I’m a novice so bear with me. When running the first block here, it errors out after downloading the SD768 checkpoint, on Installing requirements for Web UI (ran it twice).
Python 3.7.12 | packaged by conda-forge | (default, Oct 26 2021, 06:08:53)
[GCC 9.4.0]
Commit hash: 0cc0ee1bcb4c24a8c9715f66cede06601bfc00c8
Installing requirements for Web UI
Traceback (most recent call last):
File “launch.py”, line 360, in
prepare_environment()
File “launch.py”, line 309, in prepare_environment
run_pip(f”install -r {requirements_file}”, “requirements for Web UI”)
File “launch.py”, line 137, in run_pip
return run(f'”{python}” -m pip {args} –prefer-binary{index_url_line}’, desc=f”Installing {desc}”, errdesc=f”Couldn’t install {desc}”)
File “launch.py”, line 105, in run
raise RuntimeError(message)
RuntimeError: Couldn’t install requirements for Web UI.
Command: “/opt/conda/bin/python” -m pip install -r requirements_versions.txt –prefer-binary
Error code: 1
stdout:
stderr: ERROR: Ignored the following versions that require a different python version: 2022 Requires-Python >=3.8,<4.0
ERROR: Could not find a version that satisfies the requirement blendmodes==2022 (from versions: 2020, 2020.1, 2020.2, 2020.2.1, 2020.2.2, 2020.3.0, 2021, 2021.1, 2021.2, 2021.3, 2021.3.1, 2021.3.2, 2021.3.3)
ERROR: No matching distribution found for blendmodes==2022
Perhaps the specified version of Python needs to updated?
Also, am wondering if the Persistence setting of the notebook should be set to "Files Only", to perhaps prevent repeat downloading the SD checkpoint?
Thanks for any suggestions you can offer.
I updated it to version 15. That version should be fine. When I set the persistence to Files, the storage usage kept growing. Therefore, I set persistence to none.